MySQL databases
Create MySQL databases and users, set privileges, import and export .sql files, restore a database to a point in time, and allow remote connections.
The MySQL databases screen manages your account's MySQL (MariaDB) databases: the databases themselves, the
database users that connect to them, what each user may do, and which outside computers may connect. Your website
connects with host localhost.
Where: Control Panel › Databases › MySQL databases
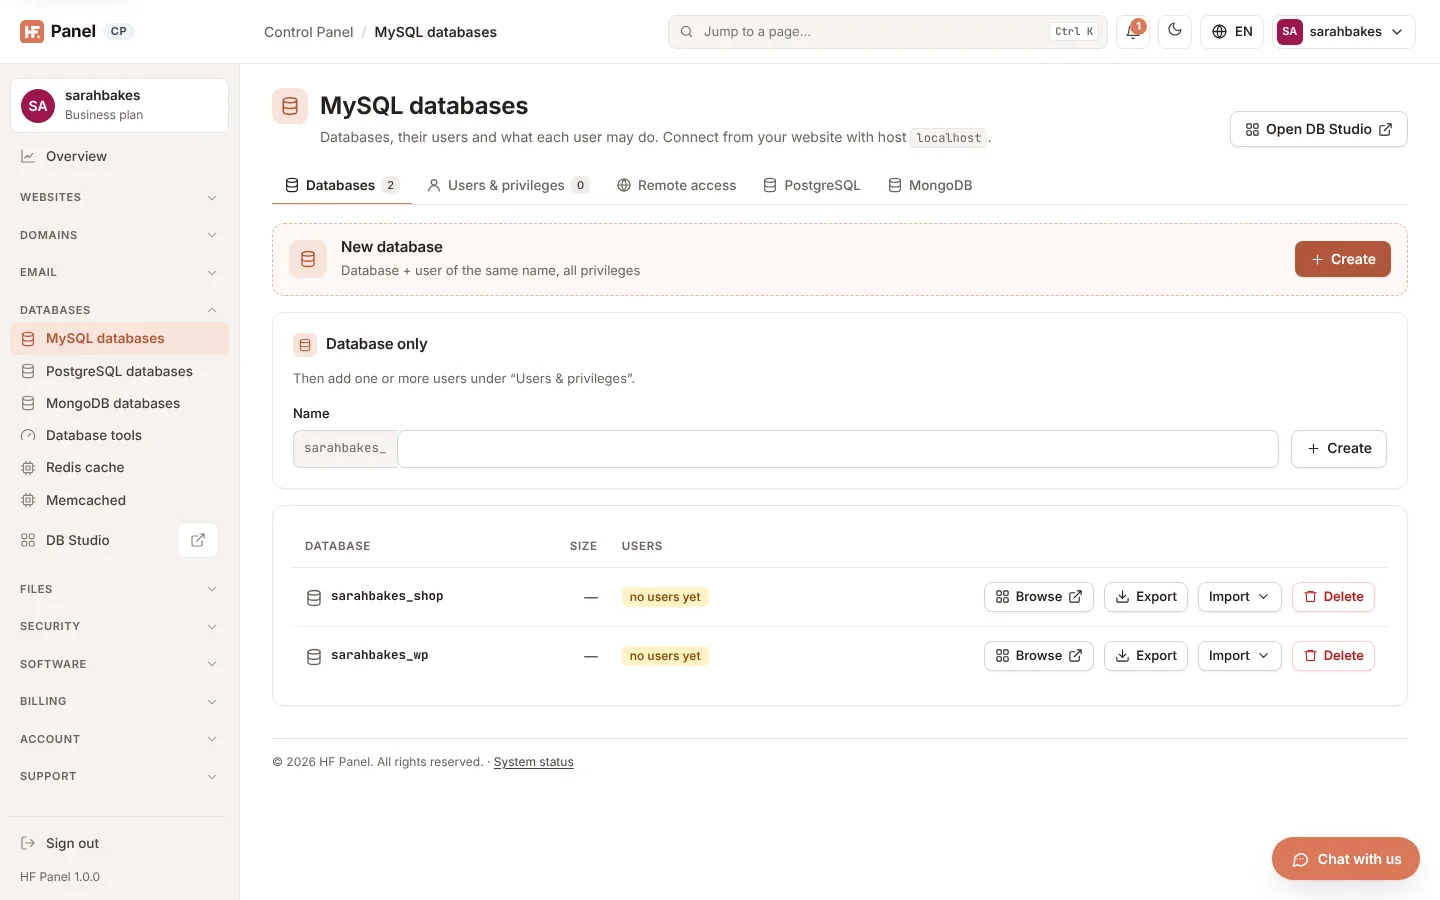
The screen has three tabs — Databases, Users & privileges and Remote access — plus links to PostgreSQL and MongoDB. Open DB Studio at the top right opens the database browser in a new tab.
Open phpMyAdmin, next to it, opens phpMyAdmin in a new tab, already signed in to your own MySQL databases (it shows only those). Use whichever you prefer: both work on the same databases. The button is there when your host offers phpMyAdmin.
Create a database and user in one step
Quick create makes a database and a user of the same name with all privileges. It is the usual choice for one website, such as a WordPress site.
- Open the Databases tab.
- Click Create on the New database card. In the dialog, type the rest of the Name after your account prefix,
for example
shop. - Click Create.
The message at the top shows the database name, the user (the same name), a random 20-character password and the
host localhost.
Important: the password is shown only once. Copy it into your website's configuration before you leave the page. You can set a new one later under Users & privileges if you lose it.
Create a database only
- Under Database only, type the rest of the Name.
- Click Create.
- Add one or more users to it on the Users & privileges tab.
| Rule | Detail |
|---|---|
| Name | your account name, _, then 1–15 lowercase letters, numbers or _ |
| Reserved names | some names are reserved; the panel says That name is reserved. Choose another. |
| Limit | MySQL and PostgreSQL databases count together towards your package's database limit |
The databases list
The list shows each database's Size and its Users (hover over a user to see its privileges). A database with no users shows no users yet.
| Button | What it does |
|---|---|
| Browse | opens the database in DB Studio, in a new tab |
| Export | downloads the database as a compressed .sql.gz file named with the database name, date and time |
| Import | uploads a .sql or .sql.gz file (up to 1 GB) into the database. Tables with the same names are replaced. |
| Delete | deletes the database after you type its name to confirm |
Import a .sql file
- Click Import next to the database.
- Choose a
.sqlor.sql.gzfile. - Click Import.
Delete a database
- Click Delete next to the database.
- Type the database name exactly.
- Click Delete.
Warning: all data in the database is lost. Its users stay, so you can delete them separately on the Users & privileges tab.
Restore to a point in time
When your host has switched it on, a database can be brought back to how it was at any minute of the last days — for example just before a plugin update went wrong or a table was deleted by mistake. The button Restore to a point in time appears next to each database.
- Click Restore to a point in time next to the database.
- In Restore to, choose the date and time (your own time zone). The line under it shows the period you can choose from.
- Choose where the result goes:
- Into a new database (the current one stays as it is) — the default. The suggested name is the start of the
database's name,
_rand the month, day, hour and minute, for exampleshop_r11021405. You can change it. - Replace this database — type the database's name to confirm. A dump of the database as it is now is made first and kept under Database tools › Dumps, so you can go back.
- Into a new database (the current one stays as it is) — the default. The suggested name is the start of the
database's name,
- Click Restore.
The restore runs in the background. A Point-in-time restore card above the list shows each step (finding the backup, loading it, replaying the changes) and the result; you can leave the page meanwhile. You also get a notification when it has finished. One restore per account runs at a time.
How it works: the newest backup of the database taken before the chosen minute is loaded, then every change made to the database after that backup is replayed up to the chosen minute.
| Rule | Detail |
|---|---|
| Period | from the first backup made after your host switched the feature on, back as far as your host keeps the change logs (7 days unless your host chose otherwise) |
| New database | counts towards your package's database limit; no user can use it until you give one access under Users & privileges |
| Replace | users and their privileges stay as they were |
| Changes made from another database | rows changed by a query run while another database was selected are restored; table changes such as ALTER TABLE run while another database was selected are not |
| Statements naming the database | when restoring into a new database, table changes that name the original database (ALTER TABLE shop.t …) are skipped; the result says how many |
Tip: restore into a new database first, check it, then point your website at it or copy what you need.
Users and privileges
Create a database user
- Open the Users & privileges tab.
- Under New user, type the rest of the User name after your account prefix.
- Type a Password, or leave it blank to have one generated.
- Click Create user. The password is shown once in the message at the top.
A password must be 8–128 characters and cannot contain quotes ('), backslashes or control characters.
Give a user access to a database
- Under Add a user to a database, choose the User and the Database.
- Leave All privileges ticked, or untick it and tick the privileges you want. Read (SELECT), Add rows, Change rows and Delete rows are ticked by default.
- Click Save privileges.
Saving again for the same user and database replaces the privileges.
| Privilege | MySQL privilege |
|---|---|
| Read (SELECT) | SELECT |
| Add rows | INSERT |
| Change rows | UPDATE |
| Delete rows | DELETE |
| Create tables | CREATE |
| Drop tables | DROP |
| Indexes | INDEX |
| Alter tables | ALTER |
| Temporary tables | CREATE TEMPORARY TABLES |
| Lock tables | LOCK TABLES |
| Execute | EXECUTE |
| Create views | CREATE VIEW |
| Show views | SHOW VIEW |
| Create routines | CREATE ROUTINE |
| Alter routines | ALTER ROUTINE |
| Events | EVENT |
| Triggers | TRIGGER |
| References | REFERENCES |
The users table shows, in Can use, every database a user may use and its privileges (or all privileges). Click the × next to a database to remove the user from it.
Change a user's password or delete a user
- Click Manage next to the user.
- To change the password, type a New password (blank = generate) and click Set. The new password is shown once — update your website's config file.
- To delete the user, click Delete user and confirm.
Remote access
By default only programs on the server can connect. Remote MySQL lets programs on other computers — a desktop database tool or another server — connect on port 3306. Only the addresses you list get through the firewall.
- Open the Remote access tab.
- In Allowed IP addresses, enter one address per line. You can use ranges such as
198.51.100.0/24(IPv4 only). The hint shows your current IP address. - Click Save.
Once addresses are saved, the screen shows the Host (the server's IP address and port 3306) and that any of your
database users can sign in.
| Rule | Detail |
|---|---|
| Addresses | up to 20, separated by new lines, spaces or commas |
| Ranges | CIDR ranges are accepted for IPv4; IPv6 addresses must be single addresses |
| Switch off | leave the box empty and click Save |
Tip: list only the addresses you need. Every address you add can try to sign in to your databases.